Getting Google to recognize your website only requires one simple action. If you haven’t posted your XML sitemap to Google Search Console, search engine crawlers might be overlooking your most important websites right now. You can’t afford to lose that much traffic.
You may let Google know exactly where your content is situated and speed up their crawling and indexing of your complete website by submitting your sitemap.
Whether you run a WordPress blog, a Shopify store, or a custom-built website, this tutorial shows how to submit an XML sitemap to GSC in simple steps.
Technical knowledge is not necessary. If you just follow the directions, your sitemap index file will show up on your Google Search Console dashboard in a few minutes.
What is an XML Sitemap and Why is it Important for SEO?
Think of an XML sitemap as a cheat sheet that you send directly to Google. It gives search engine crawlers a list of every important page on your website. Without it, Google has to search for your pages on its own, which takes longer and sometimes causes pages to be overlooked entirely.
A key contrast between XML and HTML sitemaps is sometimes overlooked by novices. An HTML sitemap makes it easier for people to navigate your website. An XML sitemap is made especially for search engines. Included is technical data such as the sitemap’s last modification date (last modified attribute), which notifies Google of a page’s most recent alteration.
This helps Google decide which pages to crawl first, making it a crucial part of any successful SEO strategy.
How to Find Your Website’s XML Sitemap URL
Before uploading a new sitemap to Google Search Console, you must ascertain its location. Most websites follow a predetermined format. To begin, type yourwebsite.com/sitemap.xml into your web browser.
Your sitemap appears as an XML code page. If nothing shows up, don’t panic. Your sitemap might be stored in the root directory under a slightly different name.
Knowing your sitemap URL is also crucial for crawl budget optimization. When you give Google a clear, precise sitemap, it concentrates its crawl time on your best pages instead of duplicates or low-value URLs. This directly affects how quickly your high-priority pages are indexed and ranked.
Locating Sitemaps on WordPress (Yoast, Rank Math, etc.)
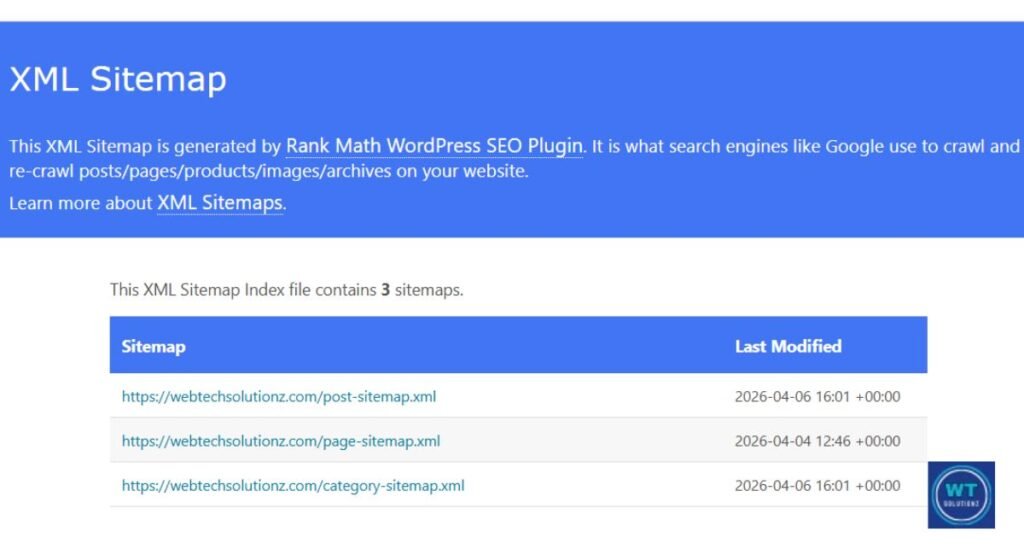
WordPress SEO plugins that generate XML sitemaps automatically include All in One SEO, Yoast, and Rank Math. When Yoast SEO is enabled, your sitemap is almost always found at yoursite.com/sitemap_index.xml. Go to your WordPress dashboard, click Yoast SEO, select “General,” and then choose the “Features” page to confirm this. Make sure the XML sitemaps toggle is turned on.
Rank Math functions similarly. Go to Rank Math on your dashboard, choose “Sitemap Settings,” and your sitemap URL will appear.
All-in-One SEO also automatically generates a plugin after it is installed. These WordPress SEO plugins (Yoast, Rank Math, All in One SEO) automatically update the sitemap each time you publish or modify a page.
Finding Sitemaps on Shopify, Wix, and Squarespace
There’s good news if you use one of these platforms. There is nothing to construct or install. Shopify automatically generates your sitemap at yourstore.com/sitemap as soon as your shop is online.xml.
Wix creates a sitemap automatically and, in some cases, sends it to Google on your behalf. Squarespace does the same, and your sitemap is always accessible at yourwebsite.com/sitemap.xml.
Additionally, these platforms automatically update the sitemap as you add new products, pages, or blog posts. All you need to do is make sure your sitemap is connected to your Google Search Console dashboard in order to guarantee that Google is instantly informed about new content.
Common Sitemap URLs for Custom-Built Websites
Custom websites typically don’t follow standard naming rules. If yoursite.com/sitemap.xml isn’t working, try some of these well-liked solutions.
| Sitemap URL Pattern | Common Platform |
| /sitemap.xml | Most CMS platforms |
| /sitemap_index.xml | WordPress with Yoast |
| /sitemap/sitemap.xml | Some custom builds |
| /news-sitemap.xml | News or media sites |
| /product-sitemap.xml | eCommerce stores |
You can also review your robots.txt file by visiting yoursite.com/robots.txt. Scroll to the bottom. Developers usually supply the sitemap URL there.
If your sitemap is still not showing up anywhere, speak with your web developer or look for the root directory in your hosting file management. The sitemap file is typically found there.
How to Submit Your XML Sitemap in GSC: Step-by-Step Guide
This is the section you came for. Learning how to submit an XML sitemap to GSC 2026 takes less than five minutes. Really? Coding skills or technical knowledge are not necessary.
All you need is access to your Google Search Console dashboard and sitemap URL. If you follow the guidelines below, you can finish before your coffee gets cold.
Make a note of one important thing before you begin. Google Search Console requires property verification (DNS or HTML tag) before you can submit anything.
If you haven’t previously, you must first validate your website. You can verify by getting a DNS record from your domain provider or by including an HTML element in the header of your website. After your website has been verified, submitting your sitemap by hand is easy.
Accessing the Sitemaps Section in Google Search Console
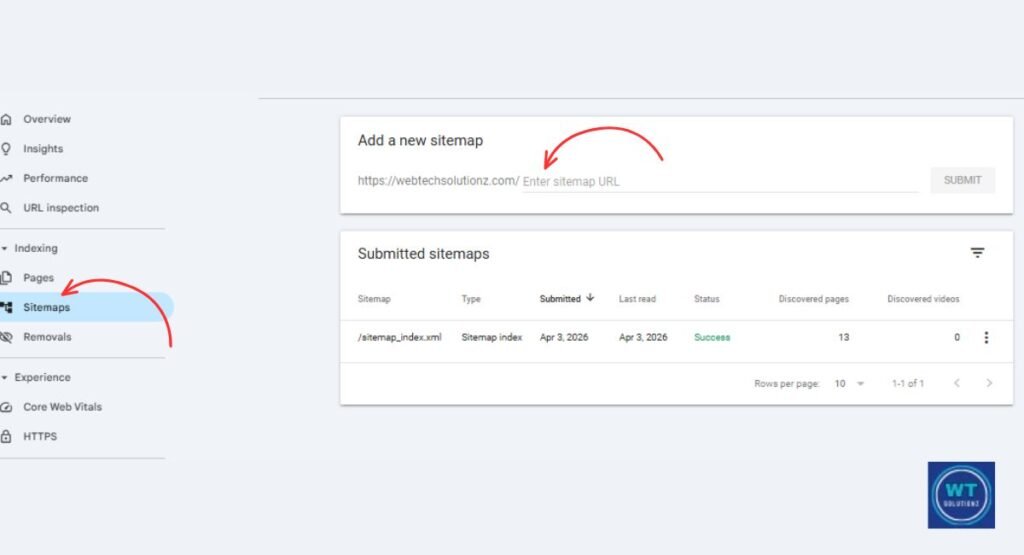
To access search.google.com/search-console, enter your Google account details. On the left is a menu. Choose “Indexing.” A drop-down menu will be present. Choose “Sitemaps.” This takes you directly to the sitemap submission panel on the Google Search Console dashboard.
Make sure you are using the right property. If you manage many websites, look at the property selection in the upper left corner. Understanding URL Prefix vs.
Domain Property is crucial in this situation. A URL Prefix property tracks only one version of your website, like https://www.yoursite.com. A domain property tracks all versions, including HTTP, HTTPS, www, and non-www. For most users, URL Prefix works perfectly for submitting sitemaps.
How to Enter the Correct Sitemap Extension
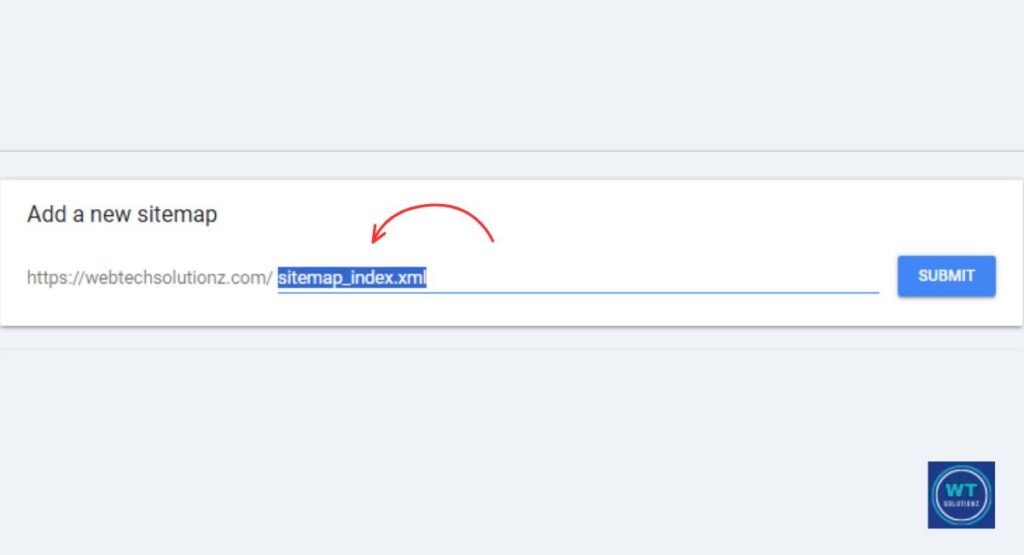
The text box at the top of the Sitemaps page says, “Add a new sitemap.” Most beginners make blunders in this area. Don’t enter your sitemap’s complete URL in that field.
Google already knows about your domain because of your previous verification. After your domain name, all you have to enter is the path.
So if your sitemap is at https://yourwebsite.com/sitemap.xml, you only type sitemap.xml in the box. If it’s a sitemap index file located at https://yourwebsite.com/sitemap_index.xml, you type sitemap_index.xml. Keeping this clean is part of good crawl budget optimization because it prevents duplicate submissions that confuse Google’s systems.
Confirming Successful Submission
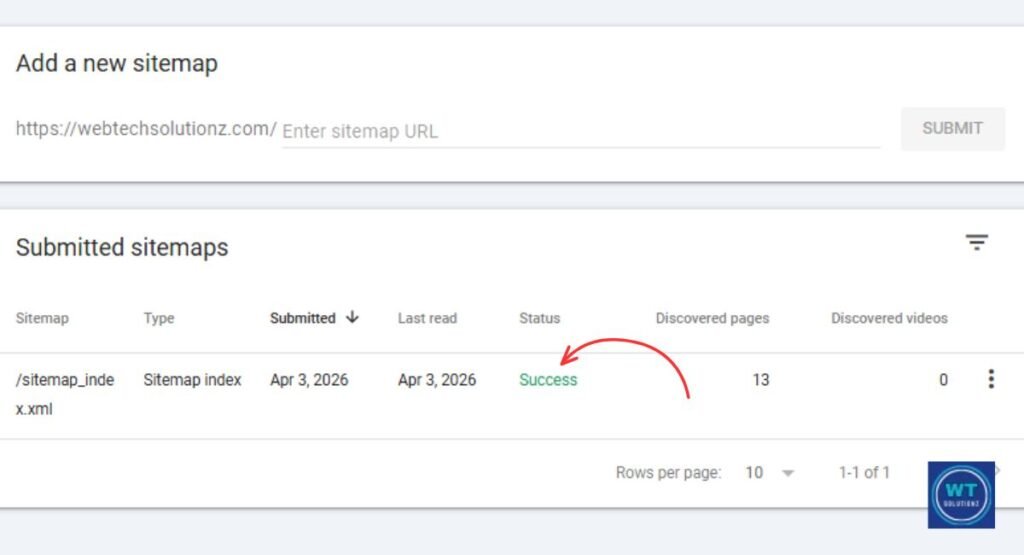
Click “Submit” once you have entered the proper path. In a matter of seconds, Google will process your request and display a status message. A green “Success” label will show up next to your sitemap URL if everything is in order.
This indicates that Google has received your sitemap and will start indexing and crawling your pages.
You shouldn’t anticipate all of your pages to show up in Google search results right now. It takes time to crawl and index. Before every page on a new website is fully indexed, it may take days or even weeks.
After 48 to 72 hours, return to your Google Search Console dashboard to track indexing progress and see how many of the URLs you found have been crawled.
Troubleshooting and Monitoring Sitemap Status
Sometimes things don’t go as planned, even if you follow every step exactly. Google may display an issue or warning next to your sitemap. Don’t worry about it.
These status labels are meant to assist you in quickly identifying crawl faults so that you can address them. Your greatest ally in this situation is the GSC coverage report. It displays the precise pages that Google was able to access and those that it was unable to.
Just as crucial as submitting your sitemap is keeping an eye on it after it has been submitted. Return frequently, particularly after releasing fresh content.
You may view a real-time snapshot of your crawling and indexing performance with the coverage report, which is updated often. This is the best usage of webmaster tools.
Understanding Status: Success, Has Errors, or Couldn’t Fetch
Google describes the state of your sitemap using three primary status labels. Here’s a detailed explanation of each.
| Status Label | What It Means | Action Required |
| Success | Sitemap found and read correctly | None, you’re good |
| Has Errors | Sitemap found but some URLs have issues | Check the coverage report |
| Couldn’t Fetch | Google cannot access your sitemap at all | Check URL and server access |
“Success” is precisely what it sounds like. Your sitemap is operational and live. “Has Errors” indicates that Google located your sitemap but encountered issues with certain URLs inside it.
These could be pages that your robots.txt file has blacklisted or pages that return a 404 error. “Couldn’t Fetch” is the most grave.
It indicates that Google is unable to access your sitemap at all. This typically indicates a server block or an incorrect URL.
How to Fix Common XML Sitemap Submission Errors
Double-checking the URL you entered in GSC is the first step in fixing the “couldn’t fetch” status. In a new tab of your browser, copy and paste the entire URL of your sitemap. The URL is correct if it loads. If it doesn’t, you might have to use your plugin or platform settings to reload the sitemap.
A blocked sitemap is another frequent problem. Check for any lines that state ” Disallow: /sitemap.xml” when you open your robots.txt file at yoursite.com/robots.txt.
If it does, Google is unable to view your sitemap because of that line. Resubmit after removing the block. Before submitting, you can check your sitemap for formatting mistakes with a sitemap validator such as XML Sitemap Validator.
Make sure to re-verify property verification (DNS or HTML tag) in GSC and submit your sitemap again if you have recently moved your website or switched domains.
Pro Tips for Sitemap Optimization and Ranking
Sending in your sitemap is only the beginning. Well-ranked websites do more than merely submit. They employ every tool at their disposal to make Google’s job easier and actively organize the structure of websites through intelligent sitemap management.
Implementing these suggestions won’t take long, but they have a significant impact on how well your pages are ranked and crawled.
Maintaining a clean sitemap is one of the most neglected aspects. Thank-you pages, admin login pages, and duplicate content are examples of no-index pages that should be removed from your sitemap.
Adding pointless URLs reduces the usefulness of your sitemap and wastes your crawl budget optimization. Only your most important pages should be there.
Managing Multiple Sitemaps and Sitemap Index Files
In essence, a sitemap index file is a sitemap that links to other sitemaps. Because Google restricts individual sitemaps to 50,000 URLs and 50MB in size, large websites employ this strategy.
A sitemap index file is the best option if your website has more pages than that, or if you wish to keep blog articles, merchandise, and videos apart.
Only the index URL is submitted when you submit a new sitemap that is a sitemap index file. Google then locates each sitemap by following the connections inside it. Because GSC displays statistics for each unique sitemap independently, this is also a cleaner approach to track indexing progress.
You may view the precise number of URLs that have been found and indexed from your blog as opposed to your product sites.
Adding Your Sitemap Link to the Robots.txt File
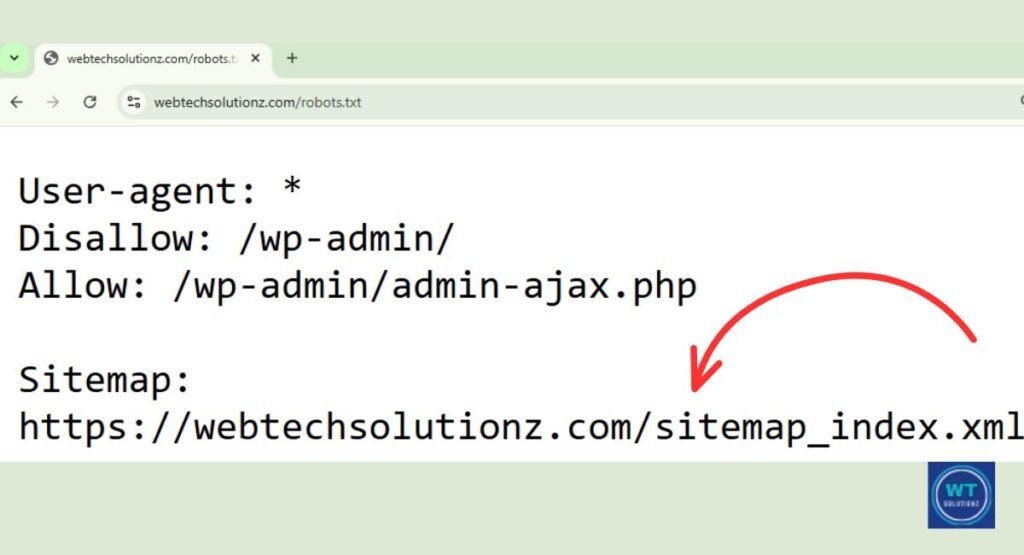
It’s easy yet wise to include your sitemap URL in your robots.txt file. This provides Google with an additional method to locate your sitemap during routine crawling, even if you have already submitted it through GSC. Add this line at the bottom of your robots.txt file after opening it.
Sitemap: https://yourwebsite.com/sitemap.xml
That’s all there is to it. Even before they visit Google Search Console, this single line aids search engine crawlers in finding your sitemap. Because Bing’s webmaster tools function similarly to GSC, it also aids other search engines like Bing in finding your sitemap.
Plugins like Yoast SEO and Rank Math automatically add this line to your robots.txt file if you use WordPress.
Read Also:
Toxic Backlinks
How to Perform a Content Gap Analysis
why are internal links important for SEO
What Is the Difference B/W SEO Analysis and an SEO Audit
How to Identify Conversion Killers Through an SEO Audit
FAQs
How long does it take for Google to crawl a submitted sitemap?
Typically, it takes a few hours to many days. Low-authority pages or new websites might take longer. You can see indexing progress in real time by looking at your Google Search Console dashboard.
Do I need to resubmit my sitemap every time I publish new content?
No. When you publish new content, the majority of platforms and WordPress SEO plugins (Yoast, Rank Math, All in One SEO) automatically update the sitemap. Additionally, Google automatically recrawls your sitemap on a regular basis. Only if you’ve made significant structural modifications to your website will you need to manually resubmit.
Can I submit more than one sitemap in Google Search Console?
Yes. You can submit many sitemaps under a single property with GSC. If you have distinct sitemaps for blog entries, merchandise, videos, and photos, this is helpful. The Sitemaps section of your Google Search Console dashboard is where you can control them all.
What’s the difference between a sitemap and a robots.txt file?
What Google should crawl is determined by a sitemap. What Google shouldn’t crawl is specified in a robots.txt file. They collaborate. The pages you want crawled are listed in your sitemap, while the pages you don’t want indexed are blocked by robots.txt.
Is submitting an XML sitemap to GSC free?
Completely free. Google Search Console is free to use. It only takes a few minutes and is free to manually submit your sitemap.
Does submitting a sitemap guarantee Google will index my pages?
No. Google determines whether to crawl your pages based on quality, relevancy, and other ranking variables, even after you provide a sitemap. Nonetheless, it greatly speeds up the crawling and indexing process.
Final Thoughts
When uploading an XML sitemap to GSC 2026, you now know how to find your sitemap URL, resolve problems, and optimize for higher positions. It’s not difficult. It’s one of the easiest ways to increase the visibility of your content in search results and give it a genuine chance to rank.
Keep your pages tidy, check your sitemap often, and let Google take care of the rest. Don’t wait for someone to find you on Google. Give it exact directions on where to search.